How to Turn off Windows Defender: Windows Defender is a Security Program added as a default in all the Windows Machines. It protects the Computers from the Spyware and Malware Attacks. All the Time, Windows Defender will be Enabled and resolves most of the Security issues. Unless a Third Party Security Software is Installed on the computer, Windows Defender Runs Continues, and Once a Protection Suite is installed, it takes a back-Step to allow the newly installed Security program to take Action.
Any PC user can Disable the Windows defender App with few changes in the Computer Settings. Most of the Time, it is kept undisturbed, and in case of unwanted notifications & connectivity issues, you must disable the Windows Defender App.
Here I have written a Simple and Brief Guide on How to stop Windows defender without any issues. Read out the Complete Guide till the End to know about Windows Defender and its settings.
What we covered?
How To Disable(Turn Off) Windows Defender:
1) Task Scheduler:

Using Task Scheduler, you can disable the Windows Defender and also it allows to fix the schedule for activating the Defender after Certain Time. Follow the Steps below to disable Windows Defender.
- Go to Start Menu and search for ‘Run’ App.
- On Run App, Type Taskchd.msc and Click Enter.
- Then ‘Task Scheduler’ App will be displayed.
- In Task Scheduler, Navigate to the Left Side Menu & Select Microsoft.
- With Drop-down Menu Select Windows Defender.
- On the Middle Box of the Window, you will see ‘MP Schedule Scan’ option, Tap on it.
- A New window Pop-ups, here Navigate to Conditions.
- Now, Find ‘Start the task only if the computer is idle for’ and Select it.
- Finally, you have options to Choose the Timings for Windows Defender Functioning.
- After Adding the Time, Save all the Changes.
This way you could deactivate Windows defender for long hours.
2) Defender Control Software:

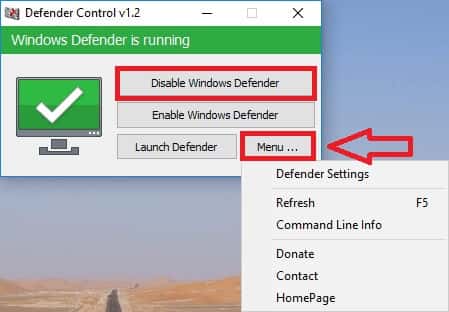
Defender Control is a Special Software that allows to stopping Windows defender without any changes or Complications. It has One-Click Feature to disable or Enable Windows Defender. Now Let’s check out the Instructions:
- First of all, Download Defender Control Software on your Computer.
- Check out the Interface and Click on Launch Defender.
- Then you will get the Present Status of Windows Defender.
- Finally, Click on Disable Windows Defender to Stop functioning until you need it.
Following the above steps, you get One-Click access to Windows Defender.
3) Local Group Policy Editor:

Local Group Policy Editor will also help you deactivate Windows Defender. It has the Settings to change the Windows Defender Functioning. For Local Group Policy Editor Setup, check the Below steps:
- Press Ctrl+R to open ‘Run’ App.
- In the Search bar, Type gpedit.msc and Click ‘Enter.’
- Now a Window with Local Group Policy Editor Opens up in Few seconds.
- Here Go to computer Configuration and Open the Drop-Down Menu to Select Administrative templates.
- From there Click on ‘Windows Defender’ Option.
- After That, A list of options will be displayed on Right of the Windows.
- In that List, Double-Click on ‘Turn Off Windows Defender’ to open a Special Window.
- Choose ‘Disable’ from the choices given in the Window, and Save Changes.
Windows Defender is now disabled permanently and you can enable by following the same steps explained above.
4) Registry Editor:

Registry Editor Tools also has the capability of handling the Windows Defender Functionality. So, you can disable the Windows Defender Program through Registry Editor too. Just Follow the steps mentioned below:
- Run ‘Regedit’ Command and Click OK to get the Registry Editor Settings.
- On The Windows Navigation to Below Path:
- Computer > HKEY_LOCAL_MACHINE > SOFTWARE > Policies > Microsoft > Windows Defender.
- When you select, you will see a few options on the Right side of the Window.
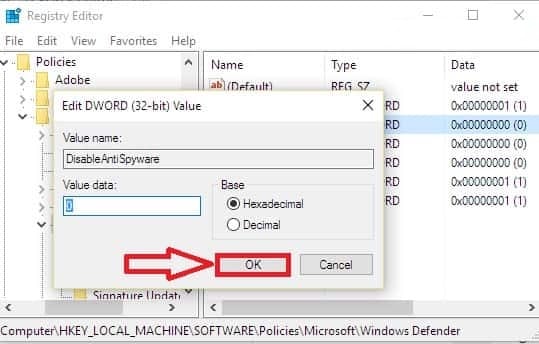
- Double-Click on ‘DisableAntiSpyware’ to open its settings.
- On the Settings Change the Value from 0 to 1.
- And Save the settings with a Click on OK.
Value ‘1’ on this Settings will deactivate the Windows Defender Application. If you want, you can enable it again by changing the Value to ‘0’ on Registry Editor.
5) Computer Management:

Any Computer can stop the Windows Defender application through Computer Management Tool. It is available in most of the Windows Machines. Check the Setup below:
- Click on Windows Button and Search for Run App.
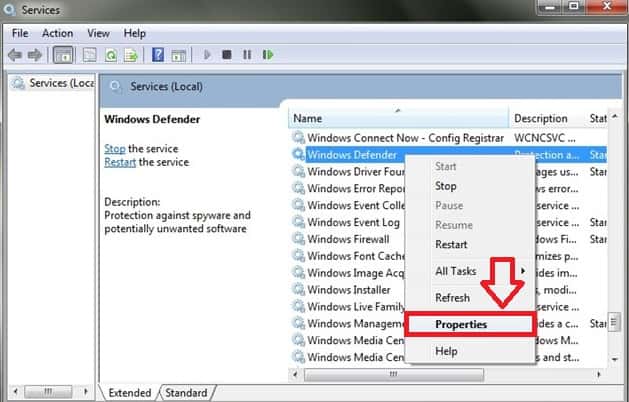
- Open Run App and Type Services.msc & Submit it.
- A Window with Title ‘Computer Management’ will be displayed on Desktop.
- In the Window, Open Right-Click Menu on Windows defender.
- Select ‘Properties’ and Navigate to ‘General’ on Properties Window.
- There Check the ‘Startup Type’ and Switch the option to Disabled.
Done with Windows Defender Settings App.
6) Settings App:

As a Basic Thing, Every Gadget has Settings App. Likewise, you can use settings App on Computer and Turn off Windows Defender. For Exact Path and Process follow the below instructions:
- Go to Settings App on your Computer.
- Scroll down to Reach ‘Update & Security’ and Tap on it.
- Then it displays Few Options, Click on ‘Windows Defender’.
- And From the Options with Toggle Switch, change the Real-time Protection to ‘Switch off’ Mode.
Above all the six Methods works mostly on all the Windows Versions, And before you turn off Windows defender make sure if it is mandatory to Disable or have other options. Because it is the Rarest Cases, where you get irritated with the issues raised due to Windows Defender.
Follow us on our Facebook Page: http://smartworld.asia/support-us/.

