How to install Windows 7 from USB Pen Drive: Windows Operating System is secure is to install on PC using DVD or Flash Drive. To use a USB Pen Drive or DVD, it should be prepared for Booting with software to make it ready to store the ISO File of Windows OS. Flash Drive is the most preferred device for booting PC, it is quick and can be done in Less time. Here in this article, I have written in detail about Installing Windows 7 from USB and Also, about Creating a Bootable USB drive to Quick Windows Installation.

how to install windows 7 from usb pen drive | install windows 7 from usb | how to install windows 7 from usb | how to install windows 7 from pen drive
Preparing a Windows Bootable USB device requires few Important Tools, that allows USB to work as a Bootable Device. Both USB and DVD devices work the same way, and the Process of Creating a Bootable device is also Similar. Here you will learn about Bootable USB drive, and You can implement the same method for DVD(Disc) too.
What we covered?
How to Create Bootable USB on your Computer:
For Creating Bootable USB (Pen Drive), You need Two Softwares ImgBurn and Windows USB. These Tools are essential to make the whole process possible. Img Burn is used to Save the Windows Installation file as an ISO file on PC. And Windows USB Tool works as a Media Transfer tool to safely store the Windows Operating System file on the Flash Drive with no Errors.
Important Notice before you create Bootable USB(Flash Drive):
- Erase the Complete USB Drive because it wipes the whole data to store the ISO File.
- Download and Save the ISO Files on your Computer to make the Process bit Easier.
Creating Bootable USB:

Step-1: After Downloading the Windows ISO file on to PC, Get the Windows USB Tool.
Step-2: Install the Windows USB Tool and Run the File.
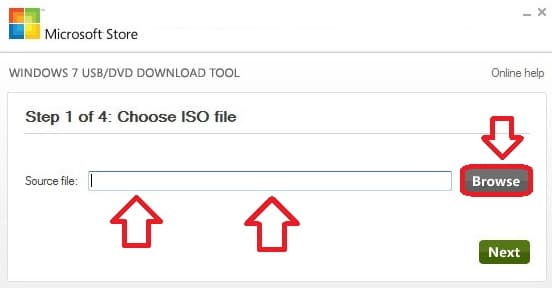
Step-3: On the First Menu, locate the ISO file with ‘Browse’ button.
Step-4: In the Next step, Choose USB Drive, and you can also choose DVD ( if you wanted to shift OS file to DVD).
Step-5: Let’s choose USB for now, Insert the USB drive and Select it in the Drop-down Menu.
Step-6: Click on ‘Begin Copying,’ it takes a few moments and you are done.
Check the Files on USB from My Computer, and you will find all the files of the Operating System, Do verify the files with the Original copy.
Now you have a Bootable USB device on your Hand. You can use it on the computer and Boot the PC anytime when needed. Next will go through the Windows Installation process with USB on Computer. Read on
How to Install Windows 7 from USB Pen Drive:
You can install windows from bootable USB and DVD in the same process. Here, let’s Select USB Pen Drive as preferred.

Step-1: Connect USB ( Flash Drive ) to Computer and Go to Windows Setup through F11 or BIOS key on Computer.
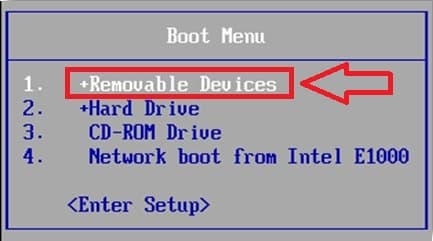
Step-2: Select the USB Device on the Boot Options and Press Enter.
Step-3: Then Set-up Language, Time and Currency and Keyboard Settings.
Step-4: Click on ‘Install Now.’ Enter the Product Key.
Step-5: Select ‘Custom’ on the Type of Installation.
Step-6: Choose a Drive for Windows installation ( You can even Format the Disc).
Step-7: Finally Click on ‘Next’ to begin the Windows Operating System Installation.
Done! You have successfully installed Windows Operating System on your Computer.
This way you can install Any Windows OS on PC from USB and Even from DVD. Just keep a Bootable Device with you all the time, so that you can Boot the PC in case of Issues with Computer Functioning or Virus Attack.
Hope you got to know about the Windows 7 Installation Completely. Do comment your Views on the Below Section.

