How to Connect Ethernet cable to laptop windows 10: You can Use Ethernet Cable to get access to the Internet from the Router by ignoring wireless connectivity. Ethernet is the only way to get maximum of the Internet speed as it is the directly connected to the router itself. Most of the Internet connections at the working place use the Ethernet Cable to get the internet access. And here in this article, we are going to explain you about the Ethernet and the Internet Access on the Windows PC.
First of all, we will switch to ‘How to use Ethernet Cable’ section. In this section, we will know about the Ethernet Cable and Setting up the Ethernet cable to PC from Router.
How to set up Ethernet cable:
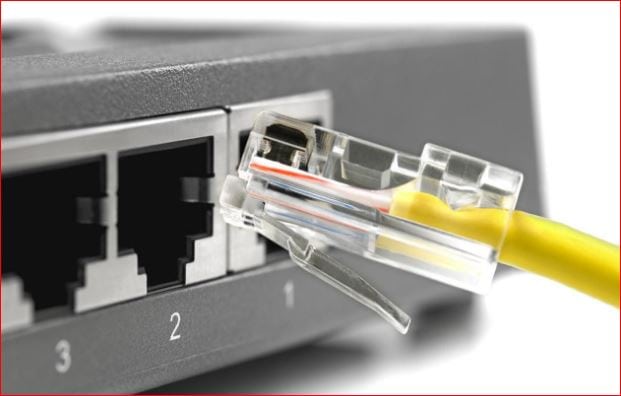
Ethernet cable is simply a Lan Connectivity Wire; we use to Access the Internet on our Computers. It mainly used to connect the Router to the Computer. Now to set up the Ethernet cable follow this steps:
- On the Router, we have Yellow And Blue Coloured Slots.
- Plugin one End of the Ethernet Cable on one of the Yellow Slots and other ends to the Computer.
- Connect the Main Internet cable(source) in the Blue colored Slot to get the Internet access.
- Turn ‘ON’ the Wifi Router and also open the Computer.
- Wait till both the devices get connected and Let the Network adapter show up on the PC.
This way you set up your Ethernet Cable and after that, we need to Configure the Ethernet Cable.
Configuring PC is very important as it ensures the perfect setup of Connectivity with the Router, and only then you get the internet access. Sometimes, you may get the internet access without any connection, as it is set to default and in a rare case, the default settings may be altered by the unknown software installed on a PC.
What we covered?
How to connect Ethernet cable to laptop Windows 10:
On your Windows PC, you need to configure the PC settings to access the Internet. All it takes is a few minutes, so follow as mentioned in the steps below:
- Click on Windows Button to display the Menu bar.
- Here Click on ‘Gear’ icon, Then you will get to See ‘Network & Internet’ Button.
- A new Window will open up, here Click on ‘Ethernet’ Option mentioned on Left Side Bar.
- Now, you get to see the number of Network Connections and Here check the status of the Ethernet Connection.
How to Connect Ethernet to Laptop Mac:
Mac PC has bit different Configuration steps, and after setting up the Ethernet cable, you need to configure the Computer so that it could send the Data Packet of Internet to the PC.
- On your Mac PC, Click on ‘Apple’ icon o get the Dropdown Menu.
- Click on ‘System Preferences’ to display a New Window Similar to “Control Panel (on Windows PC).”
- There you get to see Options related to Computer, Click on ‘Network’ options.
- Now, you will land on Network Section, Click on ‘Ethernet’ on Left Side Window.
- Click on “Advanced” options visible on Bottom Right Corner.
- Then a Menu will open-up, Click on ‘TCP/IP.’
- Change the ‘Configure IPv4’ to ‘Using DHCP’ and also click on ‘Renew DHCP Lease.’
After Making the Changes save them to apply for the Ethernet connection.
Why choose Ethernet Connection other than Wireless Cable?
Ethernet Cable has no chance of disconnection, and you get uninterrupted access to the Computer. While in the wireless connection you may face internet Errors like ‘Wifi connected but no Internet,’ ‘Limited Access to the Internet Network’ etc.
Hope you got to know the Ethernet Cable and also about accessing the internet through it. Do comment your Views from the below Section.
Follow us on our Facebook Page: http://smartworld.asia/support-us/.