What we covered?
Share screen Skype Mac, iPad & Windows:
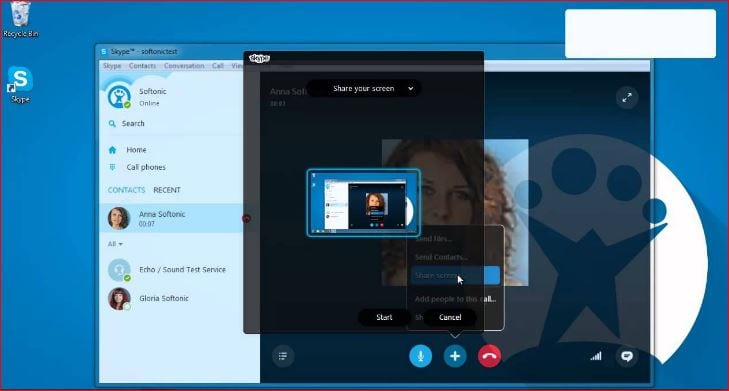
Skype is a lot of features to make use of and the Specially added Feature called ‘Screen Sharing’ gives a Perfect tool to narrate or explain for a Group of People on one Instant of time. This feature has added more value to the Skype Application. And here we are going to explain you about “How to share screen on skype Mac, Ipad & Windows.” So Let’s Begin.

Now will start with the essential features of Skype. Send files and Receiving them over internet access is possible with Skype application. And to learn to do it, Check the below Steps:
How to send Files on Skype:
- Open the Skype Application and Login with your Username Credentials.
- Now we are in, search for the Contact in the Left side panel.
- Click on the Name of the Pane to open the Conversations Window.
- Now, Click on ‘Paperclip’ icon to get the attachment options and Click on ‘Send File.’
- A new Window will pop-up to locate the file in your computer, select the file and Click on ‘Open.’
- Automatically, it uploads the file on to Skype Server and then Clicks on ‘Send.’
Receiving Files on Skype:
- Whenever a Skype User sent you a File, access it this way:
- Open your Skype Account and Navigate to Contacts section.
- You get to see a Notification from one of your Skype Contacts.
- Open it and Download the file. Your job is done.
Things to know before you start sharing the Desktop screen on Skype:
- Close all the unwanted apps you don’t want to share with your Skype Friend.
- Hide all the document and media file before you begin the Desktop Sharing.
How to share your screen on Skype (Windows PC):
- Download and install the desktop Application on the Windows PC.
- Launch the Skype Application, then Sign in to your Account with the Credentials.
- Now you see the Actual dashboard of the Skype Application.
- Navigate to Left-side Panel for Contacts, Search for your Preferred Contact.
- Click on his/her name to open the Conversation Window.
- Here click on ‘Video’ icon visible at the Top-Right Corner to start the Video Call.
- When the other person picks the call, you get a New screen with his video and few options at the bottom.
- Now, Click on ‘Three Dots’ icon beside the ‘Mic’ icon to get more video options.
- Then from the options Click on ‘Share Screen’ to enable the desktop Screen Sharing.
That’s it, you have successfully shared the Desktop screen with your Skype contact, and you can end sharing by clicking on ‘Stop Sharing Screen’ from the ‘Three Dots’ icon.
How to share screen on skype iPad & iPhone:
As per the Skype Developers Official Statement, it is known that you cannot Share your Screen. And no Option is made available for Sharing Screen on iPhone & iPad.
How to share screen on Skype Mac:
Sharing Screen on Mac PC is Similar to the Procedure of Windows Computer. And the only difference in both the procedures is their icons to view the Options, So let’s check the Process now:
- Click on the Skype App icon to open the Application.
- Sign in to your Skype Account and Navigate to the Contacts Section.
- Search for the Contact and click the contact name from the results.
- Now you get to see the Conversations Window, Click ‘Video’ icon to begin the video calling.
- After that, click on the ‘Plus’ icon to view the options and Then Click on ‘Share Screen’ options.
- To kick-start the ‘Screen Sharing’ option in no time.
This way you can Begin the Screen Sharing Feature, and you can Turn it off with a Click on ‘Stop Sharing Screen.’ That ends this topic for “How to share screen Skype Mac, Ipad & Windows.” Hope you get to know the Skype app and Do comment your views from the below section.


