What we covered?
How to Move Picture in Word Document:
Moving a picture in Microsoft Word is easy with the Latest version of MS office software. Also, you could Rotate a video in the older versions of MS word, but it is a little tricky. So here in this article, we will let you know about the Topic called ‘how to move Picture on Microsoft Word Document. Let’s Begin.
How to Move a Picture in Word Document:
Here we will help you to know about doing handling a Picture in MS Word document. To understand it briefly, Read all the Steps.
Step-1: How to insert Picture in word:
For every new version of Microsoft PC, There is a Slight change in the Interface, and they have mostly added a Separate Tab for each section to make it easy for the user in navigating towards the Tools. So now we will learn to insert Picture in MS Word Document. To do it in the right way, follow the below steps:
- Press the Windows Button and Search for Microsoft Word Document.
- Click on ‘MS word’ to open a new Word document on the desktop.
- Wait till it loads completely, Complete your Part of Writing the Text on Document.
- After finishing the writing Part, Navigate to Menu bar > ‘Insert’ Option.
- Click on ‘Insert’ option to open the different options of a word document.
- Now Click on ‘Picture’ button to get the Pop-up Window to locate a Specific Picture on the hard disk.
- Locate the Picture and Click on ‘insert’ Button to open the image on the word Document.
That’s it, following the above steps to insert Picture on Word Document.
Step-2: How to rotate a picture in word
Rotating a Picture in Microsoft Word Document is very simple, and you could do it this way:
- Once you get to know about inserting a Picture from Step-1, wait till the image loads on the Word document.
- Now Click on Picture to see a lot of options to be displayed, and on the Top-Right corner, you will see Rotate option.
- Click on it, to view a Drop Down option. After that Click on the option ( Rotate Left or Rotate Right ).
- And Make the Image as you wanted, and Save the Document by navigating to File-> Save.
Step-3: How to move a picture in word
Similar to rotating Image on the Word document, we could move the picture to other required position with a Simple trick. So let’s check the Actual Procedure here:
- By default, whenever you insert a Picture on word, it is positioned to Full length on document.
- Now to position it , check the below steps:
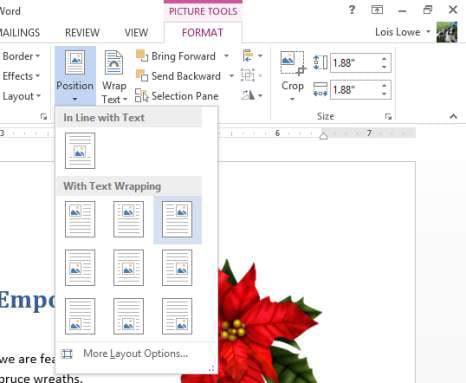
- Once you click on Picture, you will get to see Lot of options related to Image Border, Positioning, effects etc.
- So let’s Pick Position option now, when you click on Position, you get a drop down menu.
- Choose the best position suitable for your document and click on it.
And exact positoning options follow this:
Possiblity-1:
- Click on Rotate-> More Rotation option, then a new Window will pop-up.
- There you will get to see Size and Alt Text options, Alter the Numbers in the Scale, Height, Rotate options to move the picture.
Possiblity-2:
- Click on ‘Position’ to get the Drop Down Menu and Click on ‘More Layout Options.’
- Now, a new Window will open up with two Tabs, ‘Picture Position’ and ‘Text Wrapping.’
- Here choose Text Wrapping to Align the Picture in between the Text on the Word Document.
- Also choose ‘Picture Position’ to get the exact Position with Vertical, Horizontal and options.
So try out this possibilities to get the Perfect position on the word Document which ends the Topic of Moving a Picture in Word Document.
This way we move picture in word document without any hassle on the Windows Machine.
Follow us on our Facebook Page: Techy Sea